Home EV Charging Stations: A Buyer's Guide
Learn how to choose, size, and install a home EV charging station the right way. No fluff — just the questions to ask and mistakes to avoid.
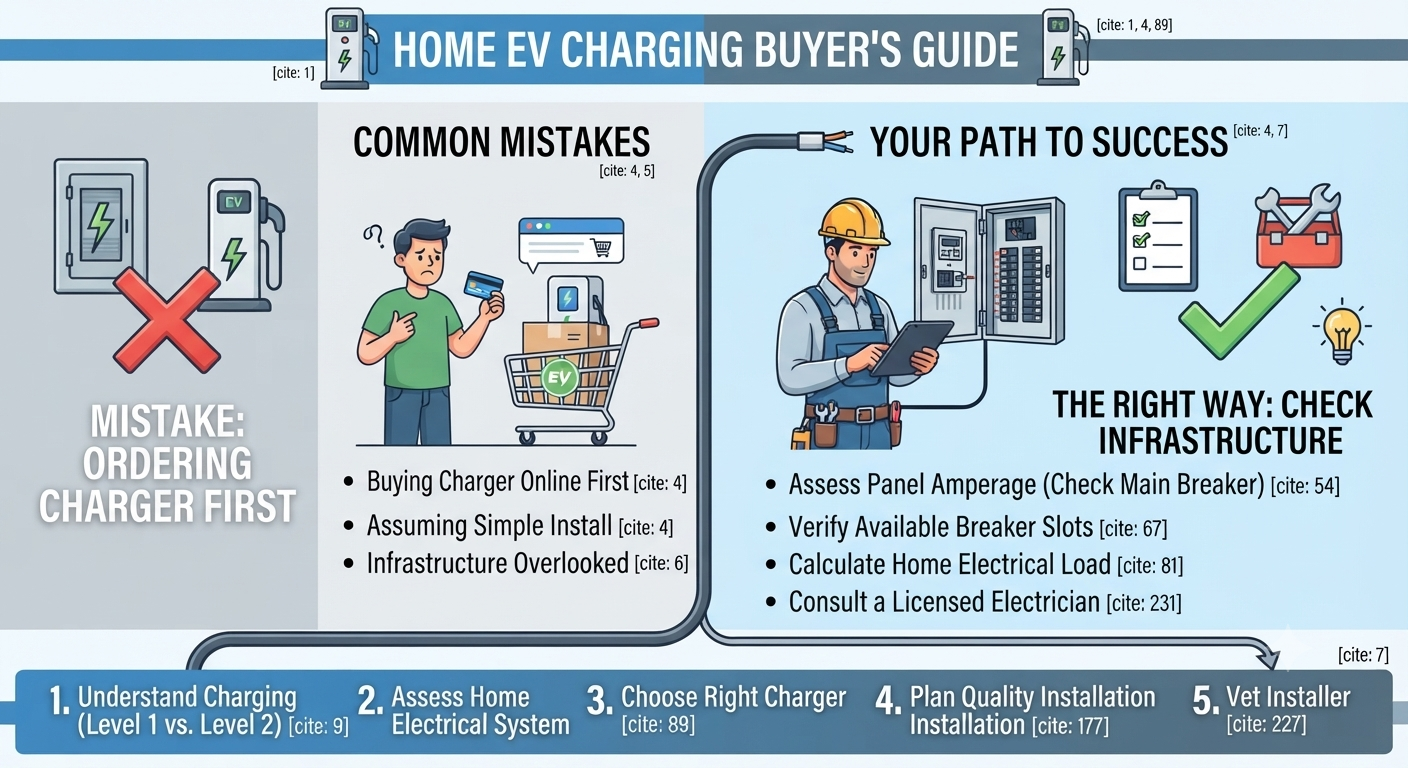
Most people buying their first home EV charger make the same mistake: they order the unit online, call an electrician, and assume it's a simple swap-in like a ceiling fan. Then the electrician shows up, looks at the panel, and the project doubles in cost and complexity overnight. The charger was never the hard part — the electrical infrastructure behind it was.
This guide walks you through every decision in the right order: how home charging actually works, what your home needs before any hardware is selected, how to choose the correct charger for your situation, what a quality installation looks like, and how to find a contractor who won't cut corners. By the end, you'll know exactly what to buy, what to ask, and what to watch out for — before a single dollar is spent.
How Home EV Charging Actually Works (Level 1 vs. Level 2 Explained)
By the end of this section, you'll know exactly how electricity moves from your wall to your battery, why two very different charging speeds exist, and which one actually makes sense for a home like yours.
Let's start with the foundation.
What "Charging Level" Actually Means
When someone says "Level 1" or "Level 2," they're describing the voltage and power delivery of the circuit — not the quality of the charger itself. Higher voltage means more electrons per second flowing into the battery. More electrons per second means more miles recovered per hour. That's the whole game.
Level 1 uses a standard 120V household outlet — the same type that powers your TV or phone charger — and the actual charger is built into the vehicle itself; the cord just delivers AC power to it. No electrician needed. No new hardware required. You plug in and walk away.
The catch is speed. Level 1 adds about 3–5 miles of range per hour. If you drove 40 miles today and come home at 20% battery, you're looking at a long night — and possibly a nervous morning.
A Level 2 EV charger delivers more power and faster charging by using a 208–240V outlet on a dedicated circuit. Think of it as the difference between drinking through a cocktail straw and a garden hose. Same liquid, completely different flow rate. It uses a 240V circuit — the same voltage that runs an electric dryer, range, or water heater — and the EPA puts it at roughly 25 to 40 miles of range per hour.
That difference is not subtle. It's the difference between waking up with a full battery and waking up with 60%.
The Side-by-Side That Makes It Click
Here's a concrete example. Say you have a 75 kWh battery and come home with 30% charge remaining — meaning you need to recover about 52 kWh worth of range.
● Level 1 at 120V: You're looking at roughly 30–40 hours to recover that range. Not overnight. Not even close.
● Level 2 at 240V: Level 2 chargers can charge a battery electric vehicle to 80 percent from empty in 4–10 hours. In a partial-charge scenario like this one, you're done before midnight.
| | Level 1 | Level 2 | |---|---|---| | Voltage | 120V | 240V | | Miles added per hour | ~3–5 | ~25–40 | | Typical overnight recovery | 30–50 miles | 200–300+ miles | | Installation needed | None | Yes — dedicated circuit | | Best for | PHEVs, low-mileage drivers | Most BEV owners |
When Level 1 Is Actually Fine
Level 1 gets a bad rap it doesn't entirely deserve. For most commuters driving under 40 miles per day, Level 1 charging overnight (8–10 hours) adds 30–50 miles — enough to top up. If you drive a plug-in hybrid with a small battery, or if your daily mileage is genuinely light, Level 1 can serve you without friction.
The problem isn't Level 1 itself — it's that most EV owners eventually outgrow it. Commutes change. Road trips happen. A second EV joins the garage. As batteries get larger, Level 1 charging becomes less useful. Designing your home charging setup around Level 1 today is a bit like buying a house and refusing to put a second bathroom in it. You'll manage until you really won't.
Why Level 2 Is the Serious Standard
Level 2 is the standard home charging solution for full battery EV owners who drive more than 40 miles daily, need reliable full-charge overnight capability, or want the fastest practical home charging speed without commercial infrastructure.
The installation requires a licensed electrician and a dedicated 240V circuit — which is exactly what the next section covers in detail. There are real cost variables involved, and your home's electrical panel plays a bigger role than most people expect. That's the conversation we need to have before you buy anything.
What Your Home's Electrical System Must Have Before You Buy Anything
Here's the truth nobody tells you before you pull out your credit card: the charger itself is the easy part. What matters is what's already inside your walls. In this section, you'll learn exactly what your electrical system needs to support a Level 2 home charger — and the three things to check before you spend a single dollar on equipment.
Think of your electrical panel as the front door to your home's power supply. Everything your home runs — the HVAC, the appliances, the lights — comes through it. Add an EV charger and you're asking that door to handle significantly more traffic, every single night.
Panel Amperage: The First Number That Matters
Your panel's amperage rating is printed right on the main breaker, usually at the top or bottom of the box. The main breaker should have a number printed on it — typically 60, 100, or 200 amps. That number is your ceiling — the maximum electrical load your home can draw at once.
Here's how it breaks down in practice:
● 200-amp panel: You're in great shape. Most 200-amp panels are designed to handle the electrical demands of modern homes, including EV chargers. As long as your panel isn't already operating near capacity, you shouldn't need an upgrade.
● 100-amp panel: This was the standard for decades and is common in homes built more than 20 years ago. A 100-amp panel may struggle to support both modern appliances and an EV charger simultaneously — but you may be able to use a workaround, like circuit-sharing and load-shedding devices, to avoid a full panel upgrade.
● 60-amp panel: You'll definitely need to upgrade. A 60-amp panel is insufficient to safely run modern appliances alongside an EV charger. Upgrading to 200-amp service is recommended for both safety and convenience.
One more sobering number worth knowing: more than 50% of American homes receive 100 amps or less of electricity — typically insufficient to support an average electrified household's HVAC systems, common appliances and lighting, and an EV charger. If your home is older, don't assume. Go look at the panel before you do anything else.
Available Breaker Slots: The Detail Everyone Forgets
Amperage capacity is only part of the story. You also need physical space inside the panel for a new breaker. While you're in there, count the empty slots. You need at least two for a 240V EV charger circuit — it takes a double-pole breaker.
A panel that's full of breakers but technically has enough amperage is still a problem. If your main panel has plenty of raw amperage but simply lacks the physical space to insert a new double-pole breaker, a sub-panel can be installed — a smaller secondary panel that adds physical breaker slots without requiring a change to your overall utility service. That's usually a far less disruptive fix than a full panel replacement.
Wire Run Distance: The Cost Variable Nobody Quotes Upfront
The distance from your electrical panel to the spot where the charger will live is a real cost driver. The further your charger is from your electrical panel, the more wire is needed — and Level 2 chargers require thick copper wiring. If wiring runs outdoors or needs to pass through walls or underground, it may require protective conduit, adding to the cost.
A 10-foot run from a panel in an attached garage is a very different job than a 60-foot run across a finished basement and out to a detached structure. Ask your electrician for a specific wire-run estimate before you decide where the charger will mount.
When a Panel Upgrade Is Unavoidable
A professional load calculation is what separates guessing from knowing. Amperage capacity is only part of the equation — you also need to consider how much electricity your home is already using. A licensed electrician can perform a load calculation that factors in your home's square footage, major appliances, heating and cooling systems, and other electrical demands.
Electrical code requires that continuous loads — like EV charging — don't exceed 80% of your panel's capacity. If a proper load calculation shows you're already sitting near that threshold before the charger is even connected, an upgrade isn't optional. A main panel upgrade from 100A to 200A or higher is the most expensive path, usually ranging from $1,500 to $4,000 or more — and includes replacing the entire panel, rewiring, and service upgrades.
The good news: most modern homes with 200-amp panels can support an EV charger without major upgrades, and about 20% of homes need additional electrical work beyond basic charger installation, according to data from Qmerit. That's a meaningful minority — but it means the odds are in your favor if your home is relatively current.
Do this assessment before you pick a charger model. The infrastructure reality has to come first. Once you know what your panel can support, you'll know what power level you're shopping for — and the next section on choosing the right charger will make a lot more sense.
The 6 Things That Actually Matter When Choosing a Home EV Charger
You've confirmed your panel can handle the load. Now comes the part most buyers rush: actually picking the charger. By the end of this section, you'll know the six specifications that separate a charger worth owning from one that just looks good in a product listing — and why each one matters more in a luxury home context than marketing copy will ever tell you.
1. Amperage Output
Amperage is the single biggest lever on charging speed. Think of it like water pressure: more amps means more electricity flowing into the battery per hour.
The two most common amperage ratings for home Level 2 EV chargers are 40 amps and 48 amps — they hit the sweet spot between charging speed, installation complexity, and cost. Here's the practical difference: a 40-amp charger typically adds about 30 miles of range per hour, while a 48-amp charger running at full output may add roughly 36–38 miles per hour.
That gap rarely matters for overnight charging. But if you're building a multi-vehicle garage or want the fastest possible refill window, the 48-amp option earns its keep. One catch: hardwired chargers connect directly from your breaker box without an outlet in the middle, which reduces resistance and heat buildup and allows for higher sustained amperage. So the 48-amp ceiling is only available to you if you go hardwired — plug-in units top out at 40.
Also worth noting: every electric vehicle has an onboard charger that controls how much power the car can accept. Even if you install a 48-amp charger, the vehicle may not always use the full charging rate. Check your vehicle's spec sheet before oversizing the circuit.
2. Cord Length
Cord length is almost always an afterthought. It shouldn't be. The standard cable runs 18–25 feet, which is fine for a straightforward pull to the driver's side door. But in luxury garages — think tandem parking, long bays, or a charger mounted near the panel — you need to map the actual distance before you order. A cable that's two feet short means a permanently awkward stretch, every single night.
3. Smart / Wi-Fi Features
A smart charger connects to your home network and gives you scheduling, energy monitoring, and remote control from an app. The real value in a high-end home: off-peak scheduling. You can program charging to start after midnight when utility rates drop, automatically. Some units also integrate with home energy management systems, letting the charger yield to other high-draw appliances rather than fight them. Section 4 digs deeper into exactly which smart features are worth the premium and which ones are filler.
4. NEMA Weatherproofing Rating
NEMA stands for National Electrical Manufacturers Association — the body that sets environmental protection standards for electrical equipment. Every charger carries a NEMA rating that tells you what it can handle outdoors.
NEMA 3R is the minimum rating considered appropriate for outdoor use, protecting against falling rain, sleet, and snow — adequate for installations under deep eaves or carport rooflines where the charger won't be exposed to horizontal wind-driven rain. NEMA 4 protects against windblown rain, dust, splashing water, and hose-directed water from any direction — recommended for open driveway installations, exposed carport columns, and any location where the charger could receive direct precipitation. NEMA 4X adds corrosion resistance to the NEMA 4 protection profile, making it ideal for coastal environments or anywhere salt air is a realistic concern.
If your charger lives in an attached garage, 3R is fine. If it's on the exterior wall of an estate near the coast, don't settle for anything less than 4X.
5. Warranty Length
A home EV charger is electrical infrastructure — treat it like one. Warranties in this category typically run one to three years on the low end, with premium units offering three to five years. For a luxury home, the warranty length signals two things: how much the manufacturer stands behind the hardware, and whether you'll have recourse when a Wi-Fi module or power relay fails mid-ownership. Always read what the warranty actually covers. Some cover parts only; others include labor reimbursement. That distinction matters when the unit is hardwired into your garage wall.
6. UL or ETL Certification
This one is non-negotiable. UL (Underwriters Laboratories) and ETL (Intertek's certification mark) are independent safety testing organizations that verify a charger has been built and tested to recognized electrical standards. An uncertified charger may still work — but it hasn't been independently verified for fire risk, insulation quality, or fault protection. Some electricians look for the UL sticker and won't install a unit without it. More practically, some homeowner's insurance policies won't cover damage caused by uncertified electrical equipment. If the product listing doesn't clearly display a UL or ETL mark, move on.
---
These six criteria form the actual checklist. Run every charger you consider through all six before you look at price. A unit that scores well on five but skips UL certification isn't a bargain — it's a liability. In the next section, we'll break down the smart features category in much more detail, because the range of what's available (and what's genuinely useful) is wider than most buyers expect.
Smart Charging Features Worth Paying For (And the Ones That Aren't)
Not every feature on a spec sheet earns its place on your wall. Some smart charging capabilities genuinely change what you pay each month. Others are dressed-up marketing that sounds impressive and does almost nothing. In this section, you'll learn which features deliver measurable value, which ones you can safely ignore, and why the right charger choice might actually unlock money from your utility company.
Scheduled Off-Peak Charging: The Feature That Pays for Itself
This is the one feature worth paying for without hesitation. Here's why.
Most utilities use time-of-use (TOU) pricing — a rate structure where electricity costs more during high-demand hours (typically late afternoon into evening) and less during overnight, low-demand windows. The gap is not trivial. During peak hours — usually 4 PM to 9 PM on weekdays — rates can reach $0.40–$0.50 per kWh, while off-peak hours typically run just $0.12–$0.18 per kWh.
A smart charger with scheduling lets you plug in whenever you get home and then automatically delays charging until rates drop. You don't think about it. It just happens. Most EV owners save $30–$80 per month — $360–$960 annually — simply by scheduling charging during off-peak hours. Two-EV households or high-mileage drivers can save over $1,500 per year. That math clears the cost premium on a smart charger in the first year alone.
Energy Monitoring: Worth It If You'll Actually Use the Data
Real-time energy monitoring lets you see exactly how much electricity your charger consumes, broken down by session, day, or month. For a luxury home with solar or a home energy management system already in place, this data is genuinely useful — it tells you whether your charging behavior aligns with your solar production window or your TOU plan.
If you're not integrating that data into anything, it becomes a nice dashboard you glance at once and forget. The feature itself won't cost you extra on most mid-to-high-tier chargers, so take it. Just don't let it be the deciding factor.
Load Management: Essential the Moment You Add a Second EV
Load management is a charger's ability to monitor your home's overall electrical draw and automatically reduce or pause charging to avoid exceeding your panel's capacity. Think of it as a traffic cop sitting between your charger and your breaker box.
For a single-EV household with a properly sized panel, load management is a nice-to-have. For a two-EV household — or a home where high-draw appliances like EV charging, HVAC, and an induction range all share the same service — it shifts from optional to essential. Without it, you're gambling that both cars never charge at full speed while the oven runs. An EV Energy Management System (EMS) can automatically balance the load of an EV charger and home energy usage to avoid a panel upgrade entirely — which alone could save thousands in electrical work.
Features That Are Mostly Marketing Noise
Skip these or treat them as tiebreakers, not decision drivers:
● Voice assistant integration. You're not going to ask Alexa to charge your car. You're going to plug it in.
● Animated displays and color touchscreens. They add cost and failure points. A simple LED status indicator does the same job.
● "AI-optimized" charging algorithms. Most of these are scheduled charging with a better name. Ask specifically what the AI does before paying a premium for it.
● Cellular connectivity as a primary connection. Wi-Fi is fine. Cellular backup can be useful, but cellular-only units carry monthly service fees that compound over time.
The Utility Rebate Angle: Smart Capability Can Unlock Real Money
Here's something most buyers don't realize until after they've already purchased: your utility may offer a rebate — or a significantly better rate plan — that requires a networked, smart-capable charger as a condition of enrollment.
Some utilities offer rebate incentives specifically for customers who sign up for off-peak charging, paired with a discounted time-of-use rate for EV owners. A growing number of states now require OCPP 2.0.1 compliance for smart charging and grid integration programs — meaning a basic, non-networked charger may disqualify you entirely. Before you buy, call your utility or check their website. The right charger could be the key that unlocks hundreds of dollars in annual rebates and rate discounts that a dumb charger simply can't access.
The bottom line: prioritize scheduling, load management if your household warrants it, and confirm your charger meets your utility's smart-capability requirements before checkout. Everything else is a bonus, not a baseline.
What a Professional EV Charger Installation Actually Involves
Most homeowners expect an EV charger installation to feel like having a new appliance delivered. It doesn't. A legitimate Level 2 install is a real electrical project — with paperwork, inspections, conduit, and code compliance baked in from the first day. By the end of this section, you'll know every step a professional should take, in order, and exactly which shortcuts signal a contractor you shouldn't hire.
Step 1: Pulling the Permit — Before Anyone Touches a Wire
A permit isn't bureaucratic red tape. It's your legal proof that the work was done safely and to code. Permits are required for Level 2 charging installations in the overwhelming majority of U.S. jurisdictions. The only real exception? Plugging into an outlet that already exists and is already rated for the load.
A permit application typically requires a one-line electrical diagram, the proposed breaker size, conductor gauge, conduit type, and the charger's UL listing number. Your electrician should handle all of this — that's part of what you're paying them for. Many jurisdictions will only issue electrical permits to licensed professionals. A licensed electrician who pulls permits on your behalf understands local requirements, can complete applications correctly the first time, and assumes liability for the work performed.
If a contractor offers to skip the permit to save you time and money, walk away. The risk falls entirely on you.
Step 2: The Panel Assessment and Breaker Work
Once the permit is in hand, the electrician starts at your electrical panel — not at the garage wall. They need to confirm the panel has capacity for a dedicated 240-volt, 50-amp circuit (the standard for a 48-amp charger running at full capacity). If the panel is too full or undersized, a subpanel or service upgrade happens here, before any other work begins.
The electrician will ensure all wiring can handle the required amperage. A new double-pole breaker is installed at the panel, sized correctly for the circuit. This is load-bearing work — getting it wrong means tripped breakers at best and overheating at worst.
Step 3: Running the Conduit
This is often the most labor-intensive part of the job. Conduit — the protective sleeve that houses your wiring — gets run from the panel to the installation location. The route matters: a straight shot through an interior wall costs far less than navigating a finished garage, running underground to a detached structure, or snaking through a crawl space.
The scope of a permit extends to the dedicated circuit, panel modifications, conduit runs, grounding, and the charger unit itself. A proper installation means every inch of wiring is protected, labeled, and traceable. Exposed Romex cable stapled to a garage wall is not a professional conduit run.
Step 4: The Outlet-or-Hardwire Decision
At the end of the conduit run, you face a choice: a plug-in receptacle (typically a NEMA 14-50 outlet) or a direct hardwired connection. Both are legitimate — the right answer depends on your charger and your priorities.
● Plug-in (receptacle): Lets you swap chargers without an electrician. More flexible if you change vehicles or charger brands down the road. NOTE: Typically yields much slower charging speeds.
● Hardwired: Cleaner look, slightly more secure, and often preferred for high-end installations where the charger is a permanent fixture.
If the charger is directly wired to the electrical panel, a permit is required. Adding a new 240-volt circuit for a plug-in charger also requires a permit. Neither option skips the paperwork.
Step 5: The Final Inspection
When the work is complete, a building inspector comes out to verify it. This is not optional, and it's not a formality. After installation, an inspector stops by to make sure everything meets safety codes, checking connections, grounding, and labeling. Most inspections take just 15–30 minutes.
The 2023 National Electrical Code requires GFCI protection for all Level 2 outdoor installations — a requirement inspectors verify at both rough-in and final stages. If anything is out of compliance, it gets flagged before the job is considered done.
What Skipped Steps Actually Cost You
Installing electrical equipment without proper permits can void your homeowner's insurance policy. If a fire or electrical issue occurs due to unpermitted work, you could be personally liable for all damages and losses. Beyond insurance, an unpermitted installation becomes a disclosure problem when you sell the home — and savvy buyers will find it.
A permitted installation is documented, adding value to your home and simplifying the process if you sell. The permit fee itself — typically ranging from $50 to $200, depending on your location and scope — is trivial compared to what you stand to lose if something goes wrong without one.
A real installation takes a few hours of labor, one or two inspection visits, and produces a paper trail you'll be glad to have. Anything that sounds faster or cheaper than that probably is — just not in the way you want it to be. The next section covers exactly how to find and vet the contractor who will do all of this the right way.
How to Find and Vet a Qualified EV Charger Installer
By the end of this section, you'll know exactly which credentials matter, the questions worth asking before anyone touches your panel, the red flags that should end a conversation, and why the lowest bid is often the most expensive decision you make.
The charger is the easy part. The person installing it is everything.
The Credentials That Actually Mean Something
Start with the baseline: your installer must be a licensed electrician in your state. That's not a preference — it's the floor. A license means the electrician has met your state's training and exam requirements and can legally pull a permit on your behalf.
One step above that is EVITP certification — the Electric Vehicle Infrastructure Training Program. EVITP provides training and certification specifically for electricians installing electric vehicle supply equipment. It's not a weekend course. To qualify, a participant must be a state-licensed electrician or provide documented proof of a minimum of 8,000 hours of electrical construction experience. The training covers charging station fundamentals, National Electric Code standards, jobsite safety, and other installation and maintenance best practices.
Why does that matter to you? EVITP certification is widely respected by EV charger manufacturers, utility companies, and government agencies — and many manufacturers and incentive programs require or prefer EVITP-certified electricians to ensure installations meet industry standards. In plain terms: a non-EVITP install could void your charger's warranty or disqualify you from utility rebates before you've charged once.
The Questions to Ask Before You Sign Anything
Don't hire an installer the way you'd hire someone to paint a room. Ask these five questions directly:
1. Are you licensed in this state, and can you pull the permit yourself? If they hesitate, move on. 2. Do you hold EVITP certification? Ask to see the certificate number. 3. Have you done Level 2 residential installs with a panel assessment included? General electricians without EV-specific experience tend to treat the job like adding a dryer outlet. 4. Will you provide a written scope of work before you start? Verbal quotes are how costs "surprise" you later. 5. What does your closeout package include? Work with a contractor who manages the permit and inspection process from start to finish and provides a clean closeout package — including equipment information, basic operating guidance, and a clear record of what was installed and where.
Red Flags That Should End the Conversation
Some signs are obvious. Others aren't.
Homeowners understandably focus on the charger brand and charge speed, while the actual success of the project depends on invisible details: circuit sizing, wire routing, torque values at terminations, grounding and bonding, correct breaker type, labeling, and inspection readiness. A contractor who never mentions any of those things hasn't thought about them.
Walk away if the contractor:
● Quotes you without visiting the site or reviewing your panel in person
● Suggests skipping the permit to "save time"
● Can't explain what load calculation means
● Pressures you to buy a specific charger they happen to resell
Skipping permits or failing inspections can result in fines, insurance issues, or even the need to uninstall and redo the work entirely. That's not a minor inconvenience — it's tearing out a finished installation and starting over at your expense.
Why the Cheapest Quote Costs the Most
The math here is straightforward once you see it. The most expensive problems rarely come from the charger itself — they come from shortcuts in electrical planning, poor load calculations, improper conductor and breaker sizing, incorrect placement decisions, and permit or inspection mistakes that force rework.
An installer who underbids the job is usually cutting corners somewhere invisible — thinner wire gauge, skipped conduit, a breaker that's wrong for continuous EV load. If the electrical system is already heavily loaded, adding a charger can lead to nuisance trips, overheating at connections, and a failed inspection that forces a redesign. You'll pay to fix it either way. The difference is whether you pay a qualified installer once, or an unqualified installer twice.
Many EV charger incentives — such as rebates from your electric utility or tax credits — require proof of a permitted and inspected installation. Without that documentation, you could miss out on hundreds of dollars in savings. And if you ever sell your home, having a permitted EV charger installation on record adds value and helps avoid hiccups during the inspection process.
Hire for competence. The credential check takes ten minutes. The rework takes weeks.
Frequently Asked Questions About Home EV Charging Stations
Every buyer, at some point, hits the same wall of unanswered questions. This section cuts through them. No hedging, no filler — just direct answers to the questions you're most likely googling at 11 p.m. before pulling the trigger on an install.
---
Can I install a home EV charger myself?
Technically, some plug-in chargers can be DIY-installed into an existing 240V outlet — but that outlet itself still needs a licensed electrician to install it safely and to code. A hardwired Level 2 charger is a different story entirely. That's a permitted electrical project, full stop. Pulling your own permit, running conduit, and landing circuits in a panel is not the same as swapping a light fixture. One mistake can create a fire hazard that insurance won't cover. Save the DIY energy for painting the garage.
---
Will a home EV charger work in a detached garage?
Yes — but the wiring run matters. A detached garage is not connected to your home's electrical panel, which means your electrician will need to trench conduit underground from your main panel to a sub-panel in the garage. That underground run adds cost, typically $500 to $1,500 or more depending on distance and local labor rates. Get that detail scoped before you buy any equipment.
---
How much will my electricity bill go up?
Less than most people fear, and far less than what gas costs. Most EV owners see their electric bill increase by $30 to $60 per month, depending on how much they drive and local electricity rates — but that usually replaces $120 to $200+ per month in gas costs. The math almost always favors electricity. Most U.S. utilities offer Time-of-Use rate plans where electricity costs 30–60% less during off-peak hours — typically midnight to 6 AM — and scheduling your EV to charge in that window is the single highest-impact action you can take to reduce charging costs.
---
Does a home EV charger increase resale value?
It does — and the numbers are real. In most markets, EV chargers increase home value and boost how quickly a home sells, with homes earning up to 3% more than comparable homes without one — equating to roughly $17,000 in added value. Speed matters too: homes equipped with a Level 2 charging station can sell up to 13% faster than comparable homes without one. One caveat: a 240-volt Level 2 charger is viewed as a sought-after amenity, while a standard 120-volt outlet typically adds negligible value. If resale is part of your thinking, install the real thing.
---
What happens to my charger during a power outage?
It stops working. An EV charger draws from the grid like every other appliance in your home — when the grid goes down, so does the charger. If you have a whole-home backup battery or a generator with a transfer switch, you can potentially run a Level 2 charger on backup power, but verify the generator's output capacity first. A 48-amp charger pulls nearly 11,500 watts. Not every backup system can handle that load.
---
Do I need a permit just to install a charger?
Yes. Any 240V circuit installation requires a permit in virtually every U.S. jurisdiction. A permit protects you legally, ensures an inspector verifies the work, and matters when you sell or file an insurance claim. Any electrician who tells you a permit isn't necessary for a Level 2 install is either wrong or cutting corners. Either way, that's your cue to find someone else.
---
What if my panel doesn't have room for a new circuit?
You have options, in order of cost: load management devices (which share an existing circuit intelligently), a sub-panel addition, or a full panel upgrade. Your electrician should assess this during the site visit — before anyone buys anything. If they skip this step, ask for it explicitly.
---
Is a hardwired charger better than a plug-in?
For most homeowners, yes. A hardwired unit is a permanent installation, recognized by appraisers as a building improvement, and typically carries a cleaner install with no exposed plug connections in a hot garage environment. A professional installation of a hardwired Level 2 charger can add $2,000 to $5,000 or more in value, as recognized by appraisers as a permanent building improvement. The plug-in version has its place — primarily for renters or people who want portability — but if this is your forever home, wire it in.
---
You've now covered everything: how charging works, what your electrical system needs, which charger specs actually matter, which smart features earn their price, what a proper installation looks like, how to vet the person doing it, and the questions that keep buyers up at night.
The one question worth sitting with before you move forward: have you had a licensed electrician physically assess your panel yet? Everything else in this guide becomes theoretical until that answer is on paper. That's the first call to make — and after reading this, you'll know exactly what to ask when you make it.